How to Log in Web Back End?
Oton Switchers features wih 2 ways to log in web back end.
- Auto Recognition of IP Address
- Manually Setting a Fixed IP Address
Connecting to a Network-Auto Recognition of IP Address
- Connect the switcher with router or IP Switcher with Ethernet cable
- Connect a monitor to the HDMI Multiview output and you will see 2 IP address for the switcher (you can directly see the IP address at built-in Multiview screen for S06M and S08M)
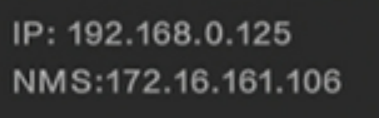
- open your browser and input the first ip address the switcher obtained from your router (192.168.0.125 here as example).
- log in with default account and password – Default account: admin, default password: admin
Connecting to a Network-Manually Setting a Fixed IP Address
When setting IP addresses manually so all units can communicate, they must share the same subnet mask and gateway settings. In addition, the first three fields of numbers in the panel’s IP address also need to match. For example, default IP address of the HDMI Switcher is 172.16.161.106 and in order to communicate with switcher, IP address of your computer will be set as 172.16.161.xxx (0-255). This means both units share the first three fields of numbers, but have their own identifying number in the last field so they won’t conflict with each other.
This is generally the most important principle to know when working via Ethernet.
Windows System
- Connect your computer to the RJ45 port on switcher
- Enter the ‘control panel’ of your computer, click ‘network and internet settings’
- Click ‘change connection properties
- Click ‘Ethernet’ in the left side menu
- Right-click Ethernet network, select ‘Properties’ in the drop list.
- Select TCP/IPv4, then click OK.
- Select ‘Use the following IP address’ and input IP address, subnet mask and default gateway, then click OK at the bottom. You are now have your network configured.
Tips: Default IP address for the video switcher is 172.16.161.106.
iOS System
- Click the Apple icon then select the System Preferences… option.
- Under Internet & Wireless, select Network.
- Click the Advanced… …
- Click TCP/IP.
- From the Configure IPv4 drop-down list, select Manually.
- Enter your IP settings in the required fields.
- Click OK.